
Manipulating photos and turning them into something new is not only fun, it opens up a whole new arsenal of interesting visuals for you to use. A good photo can communicate a lot – adding energy and life to that photo with movement can communicate even more.
The three ways I like to add life to a still photo are: creating a parallax effect, creating false slow-motion using the puppet tool, and using double exposure with portraits.
It’s handy to have these techniques in your toolbox – I find it easier to be creative when I actually know what I can do. I used pexels.com to source my royalty free no-attribution photos in these examples. Pexels has a ton of different photos that you can use for free – so I suggest starting there and finding something that strikes your fancy to practice these effects on.
The Parallax Effect
To create this effect you’ll need three things:
- A high-res photo with a fairly plain background – an out of focus background is the easiest!
- Some ability with separating photos in photoshop (I’ll share the method I use)
- Patience (listening to some good tunes helps)
Separating your photo into different layers. This step is the longest, tedious, and most important. First you’ll want to determine how many layers there will be in your parallax – usually there’s only two or three layers. (If there’s three layers, the third is almost always a very out of focus foreground object/person).
Duplicate the photo layer in photoshop. I start with the foreground first and move backwards – ending with the background image.
Begin separating out the objects that belong to the layer you are working on. There are many ways to separate objects out from an image, and you may have your preferred technique – but below is what I find most effective. (Note: make sure you hide the other layers you aren’t working on so you can actually see what you’re doing!)
1. Use the quick selection tool to select your object or subject. It doesn’t have to be perfect, but the more accurate you can make it, the less time you’ll spend in the third step.

2. Create a mask out of the selection by clicking the “Add Layer Mask” button in the bottom right.
3. Select the black and white mask layer. Use the brush tool to fine tune your mask. I often soften up and smooth out the edges in this step, as the quick select tool usually creates fairly rough and unattractive edges. You can also add hair detail back in this step that might’ve been missed in the quick select.
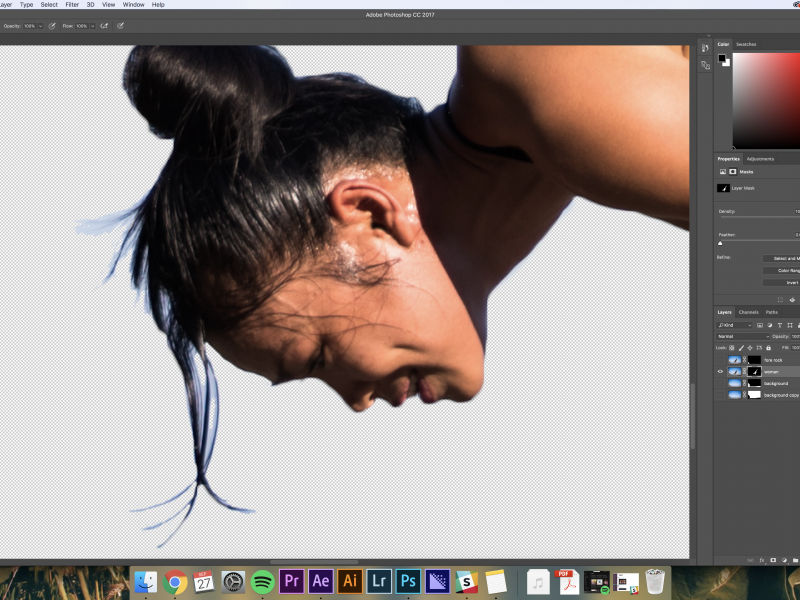
This method gives you a lot of control over the outcome and is a straightforward way to separate all the elements from your photo.
Removing your object/subject from the background. Okay, so this step might actually take longer than the first … really depends on the photo. If you have a nice, out of focus, minimal background – then this will be easy! If you have a more complicated background, maybe with windows or doors, or any sort of lines – this will take a lot longer.
It’s important to remove most, if not all, of your subject from the background to give you the most freedom when you start adding movement in After Effects. If you’re only planning to have very slight movement, then you don’t have to have a completely clean background. If you want dramatic movement, well then you have your work cut out for you (but don’t despair!)
For this step, I use the Healing Brush Tool. Depending on the circumstance, I either use the “Normal” mode, or the “Replace” mode. Usually I end up using both in a photo.
Normal Mode: The normal mode blends the pixels that you’re painting over with the pixels from the corresponding sample area. This method is great for non-distinct parts of the image, like a blank wall, or out of focus background.

Replace Mode: The replace mode does exactly that. It will replace the area you paint over with the pixels from the corresponding sample area. This method is great for hard edges and parts of the background with more detail.

To use the Healing Brush Tool, hover your mouse over an area near the part of the image you want to replace. Adjust the brush size to an appropriate size, and then alt-click to grab a sample of pixels. Then begin to “paint” over the edges of the object you want removed. The sample area will move with the brush, so you will have to resample often.
Adding movement in After Effects. Import your photoshop file, making sure to select “Editable Layers”. Create a new comp and make it 1920 x 1080. Drag your layers into this composition. Your photos will be a lot larger, so you’ll want to scale them down just so you can fit them into your preview. Enable 3D for each layer, add a camera, and add a null object. Parent the camera to the null object – I find this to be a much easier way to animate camera movements.
You’ll want to switch to two views so that you can see the distance in between your layers. Take each layer and move it in 3D space – I usually move the background first. Often I’ll scale it back up to 100% and push it as far back along the Z axis as possible, leaving some of it unseen to give room for movement along the Y and X axis.
Now it’s time to add some movement! Make sure that 3D is turned on for your null object. Click “P” to open up the Position controls for the null object and start keyframing! I usually do a push in, which is great by itself. If you want to add a little more drama, you can play with the orientation of the null object. This can create a more drastic parallax.
Make it even sweeter. If you want to add more flare to your parallax, you can create particles using CC particle. This gives it a nice dreamy feel. You can also add text in between the layers or you can add light leaks – anything you can do to sweeten normal video footage you can do to your new parallax image.
Make composite parallaxes. What makes this technique even more fun and exciting is that you’re not stuck with just using one photo. You can create unreal, fantastical, and imaginative scenes by sourcing objects from various photos and piecing them together. You’ll want to make sure that all the objects have a similar lighting so that they will fit well together in the finished composite. You’ll also want to spend more time color grading each object, and then the whole scene together, to better unite all the images.